In this tutorial, I’ll build a small interactive form.
I follow web components revolution and use google polymer framework to build this form.
Programmers replaced by business users
I would like to open one question also. Will business user replace programmers building typical line of business application? There is a huge number of applications developed by programmers that are just GUIs with some validation rules that updates DB.
Typical line of business application:
- capture some semi-structured data from user
- persist this data to some repository (document DB, traditional relation DB, simple json, xml files, etc.)
- displays transformation of data (reports, printings, contracts, graphs, etc.) in various format (HTML, PDF, XPS, etc.)
- enforce some business process, business rules - (computation, workflows, trigger events, monitor states, etc.)
Consider todo list, project managements applications, accounting applications, etc. All these are nothing else than some GUIs (views) with some navigation among them, capturing or display some persisted data.
Maybe there is a majority of programmers working on businesses that has nothing to do with software itself.
Why is not the regular business user able to create such an application itself?
The huge number of clients have some proprietary (user identification, data formats, installation, non-standard key strokes, old browsers, old platforms).
There are always so many technical, business, GUIs details (permanent and temporary address has different structure and different business rules, person titles are in one view enter in textbox, in second view selected from lists, in third view combined with typeahaed, etc.).
It is web components revolution or the new SPAs frameworks (Angular,Backbone, Knockout, Ember, etc.) are the solution that brings us to the goal.
Architecture for demo form application
The main goals when designing the form are these:
- use flexible architecture that separates data from UI, rules from processes, from tasks, etc.
- simple and rapid development of interactive form
- minimize the number of lines of code - prefer declarative to interactive
- enable to reuse maximum pieces of knowledge we created
These goals are very general. But they become more concrete during working on the form below.
If you develop any form you have to deal with these 3 main components.
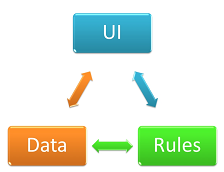
- UI - form user interface
- Data - structured data (json)
- Rules - business rules (validation rules)
What components we use
- use clever web components to encapsulate UI
- Templates - scaffolding
- Shadow DOM - encapsulation
- Custom elements - extensions
- Imports - packaging
- use business rules engine to encapsulate validation rules
- use json data as raw json with no plumbing (extends, observables, etc.)
- use polymer binding to connect these three components together
Basic steps for implementation
Let’s start. Out basic steps are
- create the app structure
- design the GUI form - draw the form
- define data + bind to GUI
- define business rules + bind to GUI
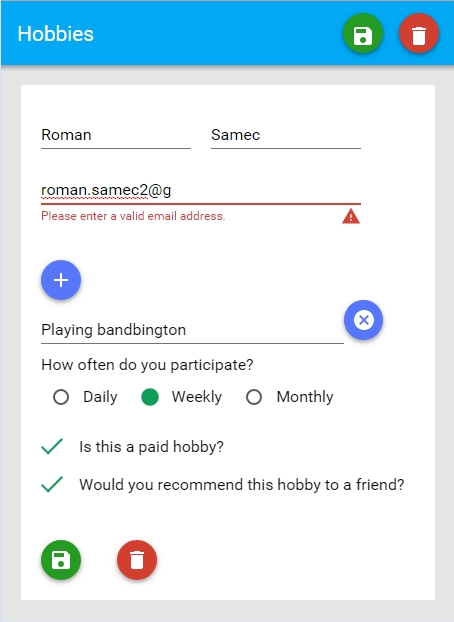
The business requirements for our hobbies form are these:
- employee
- name -> first name + last name is required, maximum 15 characters long
- email is required, maximum 100 characters long, email must be a valid email address as defined by RFC 5322, section 3.4.1.
- hobbies
- each employee must give at least 2 hobbies, maximum hobbies is 4
- hobby name is required, maximum 100 characters long
- each hobby can have optional information about
- How often do you participate in this hobby
- Is a paid hobby
- Would recommend this hobby to a friend
Step 1: Creating the app structure
Before you start, check that you have installed node.js on your machine.
Create some directory for example clever-form-demo and create 3 files
- package.json
- bower.json
- index.html
package.json
{
    "name": "clever-form-demo-app",
    "version": "0.0.0",
    "devDependencies": {
        "http-server": "^0.6.1",
        "bower": "^1.3.1"
    },
    "scripts": {
        "postinstall": "bower install",
        "prestart": "npm install",
        "start": "http-server -a localhost -p 8000 -c-1"
    }
}
bower.json
{
  "name": "clever-form-demo-app",
  "version": "0.0.0",
  "authors": [
    "rsamec <roman.samec2@gmail.com>"
  ],
  "description": "the fastest way to create interactive forms",
  "main": "index.html",
  "license": "MIT",
  "dependencies": {
    "polymer": "latest",
    "core-header-panel": "polymer/core-header-panel#~0.4.2",
    "core-toolbar": "polymer/core-toolbar#~0.4.2",
    "paper-input": "polymer/paper-input#~0.4.2",
    "paper-radio-group": "polymer/paper-radio-group#~0.4.2",
    "paper-checkbox": "polymer/paper-checkbox#~0.4.2",
    "paper-toast": "polymer/paper-toast#~0.4.2",
    "paper-fab": "polymer/paper-fab#~0.4.2",
    "core-localstorage": "polymer/core-localstorage#~0.4.2",
    "clever-paper-input": "*",
    "clever-core-list": "*",
    "clever-rule-service": "*"
  },
  "ignore": [
    "**/.*",
    "node_modules",
    "bower_components",
    "test",
    "tests"
  ]
}
index.html
<!doctype html>
<html>

<head>

    <title>clever form demo app</title>

    <meta name="viewport"
          content="width=device-width, minimum-scale=1.0, initial-scale=1.0, user-scalable=yes">

</head>

<body unresolved>

</body>

</html>
Run npm start from command line and open the index.html in your browser http://localhost:8000/index.html.
You have an empty clever form demo app.
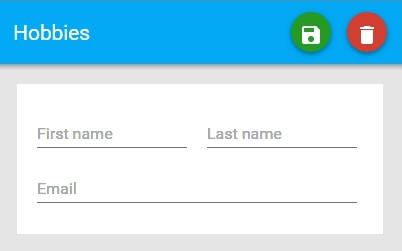
Step 2: Design your form
We are going to do it manually, but you can draw your own form using viewsiwig editor polymer designer.
Add to index.html the following:
- add html imports to head
- add polymer script platform.js
- for polymer elements
- for clever form elements.
- add elements to body
- add core-header-panel element - a simple container that holds a header and some content.
- add core-toolbar - element serves as a container for tabs, menu buttons, and other controls.
- add clever-paper-input extends paper-input - is a single- or multi-line text field where user can enter input
- add some styles to index.html
html imports to index.html -> head
<script src="bower_components/platform/platform.js"></script>

         <!-- add fonts -->
         <link rel="import" href="bower_components/font-roboto/roboto.html">

         <!-- add toolbar and panel -->
         <link rel="import" href="bower_components/core-header-panel/core-header-panel.html">
         <link rel="import" href="bower_components/core-toolbar/core-toolbar.html">

         <!-- add basic input elements -->
         <link rel="import" href="bower_components/paper-radio-group/paper-radio-group.html">
         <link rel="import" href="bower_components/paper-radio-button/paper-radio-button.html">
         <link rel="import" href="bower_components/paper-checkbox/paper-checkbox.html">

         <!-- add awesome buttons and messages -->
         <link rel="import" href="bower_components/paper-fab/paper-fab.html">
         <link rel="import" href="bower_components/paper-toast/paper-toast.html">

         <!-- add clever elements -->
         <link rel="import" href="bower_components/clever-paper-input/clever-paper-input.html">
         <link rel="import" href="bower_components/clever-core-list/clever-core-list.html">

         <!-- add local storage -->
         <link rel="import" href="bower_components/core-localstorage/core-localstorage.html">

         <!-- add clever rule service -->
         <link rel="import" href="bower_components/clever-rule-service/clever-rule-service.html">
content to index.html -> body
<core-header-panel>
        <core-toolbar>

            <span flex>Hobbies</span>
            <paper-fab icon="save" mini class="green" on-click="{{saveButtonClick}}"></paper-fab>
            <paper-fab icon="delete" mini class="red" on-click="{{resetButtonClick}}"></paper-fab>

        </core-toolbar>

        <div class="container">
            <section>
                <div horizontal layout>
                    <clever-paper-input label="First name" placeholder="First name"
                                        style="width: 150px" layout vertical></clever-paper-input>
                    <clever-paper-input label="Last name" placeholder="Last name"
                                        style="width: 150px; margin-left: 20px" layout vertical></clever-paper-input>
                </div>

                <clever-paper-input label="Email" placeholder="Email" layout vertical></clever-paper-input>
            </section>
        </div>
    </core-header-panel>
styles to index.html -> head
<style>

        html, body {
            height: 100%;
            margin: 0;
            background-color: #E5E5E5;
            font-family: 'RobotoDraft', sans-serif;
        }

        core-header-panel {
            height: 100%;
            overflow: auto;
            -webkit-overflow-scrolling: touch;
        }

        core-toolbar {
            background: #03a9f4;
            color: white;
        }

        paper-fab {
            color: #FFF;
            margin-right: 2em;
        }

        paper-fab.blue {
            background: #5677fc;
        }

        paper-fab.green {
            background: #259b24;
        }

        paper-fab.yellow {
            background: #ffeb3b;
            color: #000;
        }

        paper-toast {
            color: #FFF;
        }

        paper-toast.blue {
            background: #5677fc;
        }

        paper-toast.green {
            background: #259b24;
        }

        paper-toast.red {
            background: red;
        }

        .container {
            background-color: #FFF;
            margin: 20px;
            padding: 20px;
            z-index: 1000;
        }

    </style>
You should see the results.
Step 3: Add data and data binding
- wrap created UI (core-header-panel element) with template element with id = “hobby-form” to get polymer support to data binding
- add core-localstorage element before core-header-panel element to be able to store our data to local storage
- add paper-toast elements after core-header-panel element to add some notifications
<template id="hobby-form" is="auto-binding">
<core-localstorage id="storage" name="data" value="{{data}}"></core-localstorage>
<core-header-panel>
...
</core-header-panel>
<paper-toast id="success" class="green" text="Your data has been successfully saved."></paper-toast>
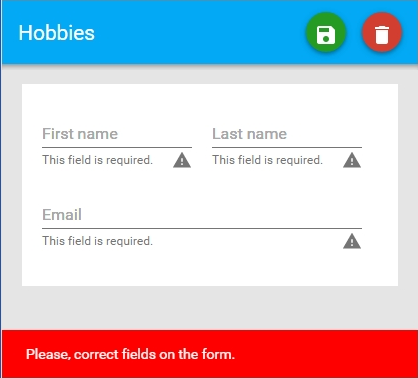
<paper-toast id="error" class="red" text="Please, correct fields on the form."></paper-toast>
</template>- add data bindings for fields
- value=”{{data.Person.FirstName}}”
- value=”{{data.Person.LastName}}”
- value=”{{data.Person.Contact.Email}}”
<clever-paper-input label="First name" placeholder="First name"
                                        value="{{data.Person.FirstName}}"
                                        style="width: 150px;" layout vertical></clever-paper-input>
<clever-paper-input label="Last name" placeholder="Last name"
                                        value="{{data.Person.LastName}}"
                                        style="width: 150px; margin-left: 20px;" layout vertical></clever-paper-input>

<clever-paper-input label="Email" placeholder="Email"
                                        value="{{data.Person.Contact.Email}}"
layout vertical></clever-paper-input>- add script tag to body
- initialize data in template-bound event
- create saveButtonClick event handler
- create resetButtonClick event handler
<script>
var t = document.querySelector('#hobby-form');
// create an empty first row to indicate user should fill in something
var defaultEmptyData= {Person:{Contact:{}}, Hobbies: [{}]};
t.addEventListener('template-bound', function () {
this.data = this.data || defaultEmptyData;
});
t.saveButtonClick = function () {
document.querySelector('#storage').save();
document.querySelector('#success').show();
};
t.resetButtonClick = function () {
this.data = defaultEmptyData ;
};
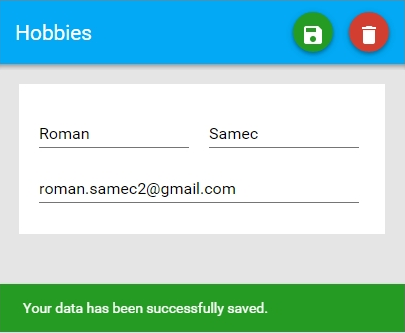
</script>Now we have create, save, edit data functionality for the form.
- when you click on green save icon your data will be successfully saved.
- when you refresh your browser last saved data will be loaded.
- when you click on red reset icon your data will be reset.
Step 4: Add business rules
- create a new file schema-rules.json - declarative validation rules definition - business rules
- add rule bindings for fields using clever-paper-input
- add clever-rule-service web component to body to template
- extend saveButtonClick event handler to support validation
schema-rules.json
{
    "Person": {
        "type": "object",
        "properties": {
            "FirstName": {
                "type": "string",
                "title": "First name",
                "required": "true",
                "maxLength": "15"
            },
            "LastName": {
                "type": "string",
                "title": "Last name",
                "required": "true",
                "maxLength": "15"
            },
            "Contact": {
                "type": "object",
                "properties": {
                    "Email": {
                        "type": "string",
                        "title": "Email",
                        "required": "true",
                        "maxLength": 100,
                        "email": "true"
                    }
                }
            }
        }
    },
    "Hobbies": {
        "type": "array",
        "items": {
            "type": "object",
            "properties": {
                "HobbyName": {
                    "type": "string",
                    "title": "HobbyName",
                    "required": "true",
                    "maxLength": 100
                },
                "Frequency": {
                    "type": "string",
                    "title": "Frequency",
                    "enum": ["Daily", "Weekly", "Monthly"]
                },
                "Paid": {
                    "type": "boolean",
                    "title": "Paid"
                },
                "Recommedation": {
                    "type": "boolean",
                    "title": "Recommedation"
                }
            }
        },
        "maxItems": 4,
        "minItems": 2
    }
}
add rule bindings for fields
- rule=”{{rules.Children[‘Person’].Rules[‘FirstName’]}}”
- rule=”{{rules.Children[‘Person’].Rules[‘LastName’]}}”
- rule=”{{rules.Children[‘Person’].Children[‘Contact’].Rules[‘Email’]}}”
<clever-paper-input label="First name" placeholder="First name"
                                    rule="{{rules.Children['Person'].Rules['FirstName']}}"
                                    value="{{data.Person.FirstName}}"
                                    style="width: 150px" layout vertical></clever-paper-input>
<clever-paper-input label="Last name" placeholder="Last name"
                                    rule="{{rules.Children['Person'].Rules['LastName']}}"
                                    value="{{data.Person.LastName}}"
                                    style="width: 150px; margin-left: 20px" layout vertical></clever-paper-input>
<clever-paper-input label="Email" placeholder="Email"
                                    rule="{{rules.Children['Person'].Children['Contact'].Rules['Email']}}"
                                    value="{{data.Person.Contact.Email}}" layout vertical></clever-paper-input>
index.html - body->template
<clever-rule-service rules="{{rules}}" url="../schema-rules.json" rulesFormat="JSONSchema"></clever-rule-service>index.html - body->script
t.saveButtonClick = function () {
var result = this.rules.Validate(this.data);
if (result.HasErrors) {
document.querySelector('#error').show();
return;
}
document.querySelector('#storage').save();
document.querySelector('#success').show();
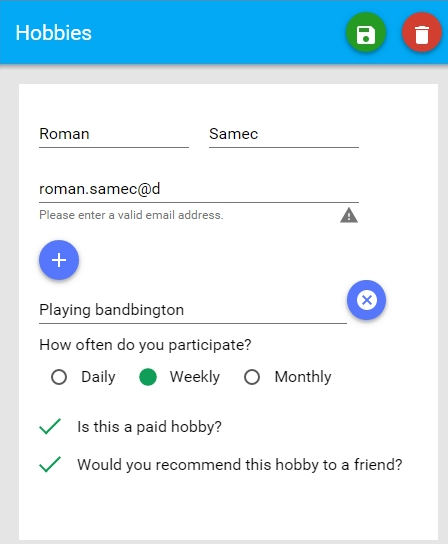
};Now we have validations functionality for the form. When you click on green save icon and your data are empty, you will get errors messages
Step 5: Add list of hobbies -> using collection-based structures
- add UI - using clever-core-list - see below
- look at data and rules binding for clever-core-list
- items=”{{data.Hobbies}}”
- rules=”{{rules.Children[‘Hobbies’]}}”
- on-array-item-changed=”{{validate}}”
- look at data and rules binding for item inside list - clever-paper-input
- value=”{{model.data.HobbyName}}”
- rule=”{{model.rules.Rules[‘HobbyName’]}}”
index.html - body->template
<section>
                <div horizontal layout>
                    <paper-fab icon="add" mini class="blue" on-click="{{addButtonClick}}"></paper-fab>


                </div>

                <clever-core-list items="{{data.Hobbies}}" rules="{{rules.Children['Hobbies']}}"
                                  on-array-item-changed="{{validate}}"  height="240">
                    <style>
                        paper-checkbox{
                            padding:0px 20px 20px 0px;
                        }
                    </style>
                    <template>
                        <div horizontal layout>
                            <clever-paper-input label="Name" placeholder="Name" rule="{{model.rules.Rules['HobbyName']}}"
                                                value="{{model.data.HobbyName}}" layout vertical></clever-paper-input>
                            <paper-fab icon="cancel" mini class="blue" on-click="{{removeButtonClick}}" index=""></paper-fab>
                        </div>

                        <span>How often do you participate?</span>

                        <div horizontal layout>

                            <paper-radio-group selected="{{model.data.Frequency}}" valueattr="label">
                                <paper-radio-button label="Daily" id="paper_radio_button"></paper-radio-button>
                                <paper-radio-button label="Weekly" id="paper_radio_button1"></paper-radio-button>
                                <paper-radio-button label="Monthly" id="paper_radio_button2"></paper-radio-button>
                            </paper-radio-group>
                        </div>
                        <br />

                        <div horizontal layout>
                            <paper-checkbox checked="{{model.data.Paid}}"
                                            role="checkbox"></paper-checkbox>
                            <div vertical layout>
                                <span class="checkboxLabel">Is this a paid hobby?</span>
                            </div>
                        </div>

                        <div horizontal layout>
                            <paper-checkbox checked="{{model.data.Recommendation}}"></paper-checkbox>
                            <div vertical layout>
                                <span class="checkboxLabel">Would you recommend this hobby to a friend?</span>
                            </div>
                        </div>
                    </template>
                </clever-core-list>

</section>- to add rows -> create addButtonClick event handler
- to remove rows -> create removeButtonClick event handler
index.html - body->script
t.addButtonClick = function () {
        this.data.Hobbies.push({});
        this.rules.Rules["Hobbies"].Validate(this.data);
    };
    t.removeButtonClick = function (event, detail, sender) {
        var index = parseInt(sender.attributes["index"].value,10);
        this.data.Hobbies.splice(index, 1);
    };
Now we have list of hobbies functionality for the form.
- when you click on blue add icon, you can add new rows
- when you click on blue remove icon, you can remove existing rows
Final notes
Maybe the web components are the shift in development line of business applications. You can look at web components as lego blocks that enables to users with knowledge of HTML markup to build applications from them. I try to demonstrate this with interactive form.
This shift is good for companies (no in house programmers needed), but i think it is good also for programmers (they can concentrate on “real” software). Don’t hesitate to tell your opinion.